Tuesday, June 9, 2009

Checking in...

Hi, foodie friends!

I just thought I'd drop in and say "Hello!" I hate how distant I've become over the last few weeks (or has it been months)? I started out with such grand ideas of what I would write and post on my blog and I just haven't made the time for it. I'm hoping that I have gotten settled into enough of a routine to start back up regularly soon.

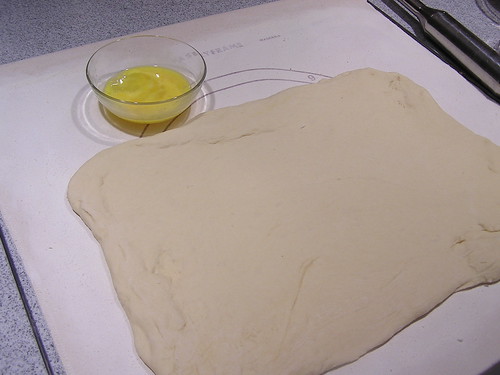
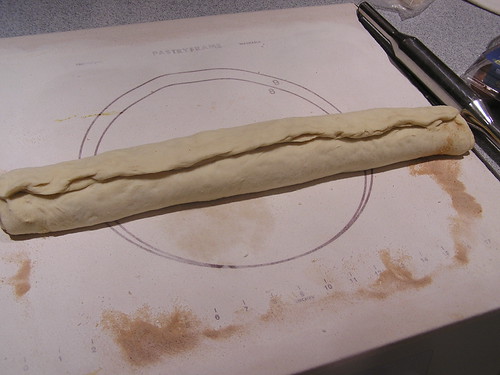
I'm in the middle of making my first biscuit roulade. My cutie pie son has requested a light saber birthday cake for Friday at the bowling alley. He turns 6 this week!! He lost his first tooth last week!! Yikes - these days are flying too quickly. I'll post photos of the finished cake. I'm not sure how detailed I'm going to be. It may end up just being a red log - I'm hoping he'll be able to use his imagination to turn it into a light saber if it does turn out more like a log. It was really fun to bake the cake - it's nothing more than eggs, flour, cornstarch, sugar, vanilla, and cream of tartar - no leaveners or butter. It rolled up beautifully without cracking. When I finish it, I'll try to write a bit more about it. I will definitely try making another one. The Christmas yule log has interested me for a while and now I've made one of the basic components, so I will have to give it a try in December.

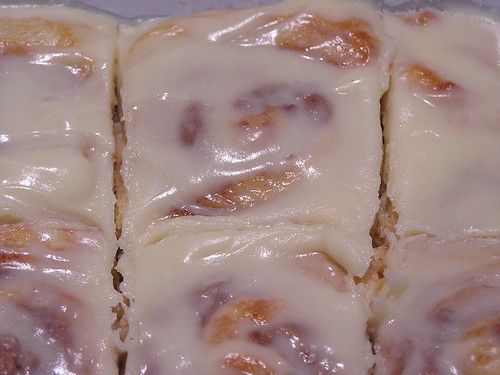
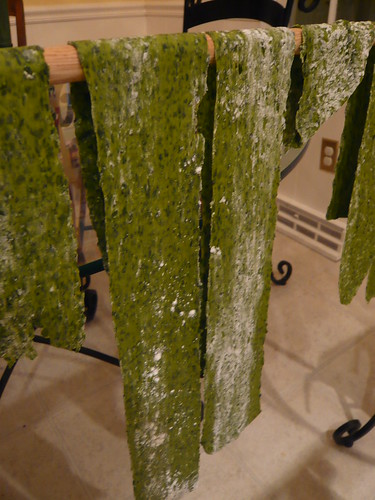
I really miss baking and cooking! I've chosen to put my time in the kitchen aside while I'm working full-time because I think it's going to be short-term. However, as the days and weeks roll on, I'm realizing that I need to make time for it. I made some pasta last night for dinner with tuna, feta, lemon zest, and wilted spinach. The pasta was made from scratch with my fun pasta attachment. I want to try making it again with some of my herbs.

P4080001

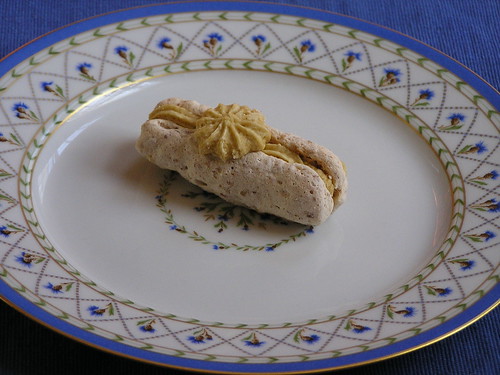
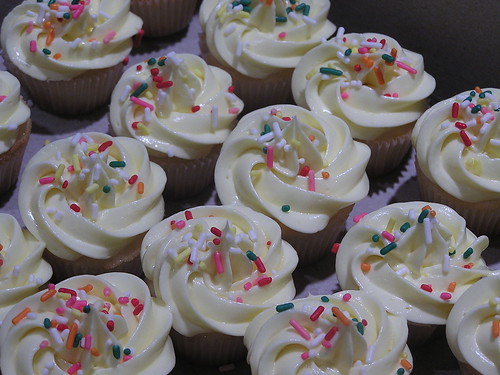
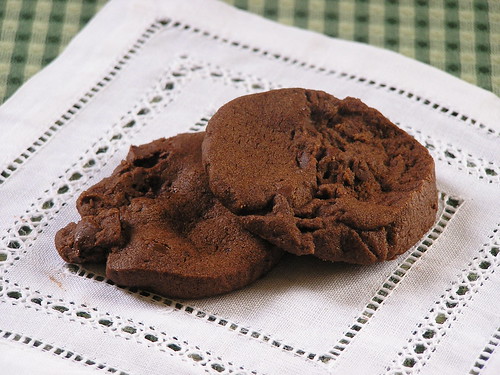
Pictured above is a delicious cookie that I made a few months ago. My mom has treated me to several cooking classes and we took one years ago that offered this as the dessert. I haven't made it again until now. They are so good. If you love cinnamon lattes, you'll love these. They're called Coffee Pecan Meringues. Here's the recipe:

Coffee Pecan Meringues
from Roosters cooking class, Greensboro, NC

Pecan Meringues
4 egg whites
1 cup sugar, divided
1 pinch salt
3/4 cup pecans, ground
1/4 teaspoon cinnamon
2 tablespoons cornstarch

Coffee Filling
4 egg yolks (preferably pasteurized)
1/2 cup sugar
1/3 cup very strong coffee
2 sticks butter, unsalted
2 tablespoons dark rum

Set racks in the upper and lower thirds of the oven and preheat to 300 degrees.

For the meringues, beat the egg whites with the salt on medium speed until white and opaque. Increase the speed to maximum and beat in half of the sugar in a streams, continuing to beat until the egg whites are very firm, but not dry. Combine the remaining sugar, the ground pecans, cinnamon and cornstarch and fold into the egg whites.

Pipe 3-inch fingers on paper-lined pans with a pastry bag fitted with a 1/2-inch plain tube. Bake the fingers about 25 minutes, until golden and fairly dry. They burn easily.

For the buttercream, whisk the yolks in the bowl of an electric mixer. Whisk in the coffee, then the sugar. Place over a pan of simmering water and whisk until thickened. Beat by machine on medium speed until cold. Beat in the butter in 5 or 6 additions, then the rum.

Line up half of fingers on a clean, paper-lined pan, rounded side down. Pipe a line of the buttercream on each finger, then top with the remaining fingers, flat side down. Turn the coupled fingers sideways and pipe a rosette of the buttercream on each. Sprinkle the rosette with the chopped pecans and dust very lightly with confectioners' sugar.

Wednesday, May 20, 2009

Birthday Cuppycakes

I made some cupcakes for Benjamin's mock birthday party at school last Friday. He has a summer birthday, so his thoughtful teachers offered to let him celebrate with his preschool friends a few weeks early. I made white cupcakes with a delicious vanilla frosting, both from The Cake Bible. If you have read my posts before, you know I've been going through a phase with this book!

P5140080

Here is the recipe for the Neoclassic Buttercream. It's so smooth and easy to frost and is wonderfully delicious. I altered it a bit and omitted one stick of butter. My children find the frostings from the cookbook not sweet enough, and so, I tried to accomodate their tastes with this one tweak. I added a splash of vanilla and a pinch of salt and also left out the liqueur. I sampled a bit of it with amaretto, and I loved it. I hope to have a grown-up affair where I can use the amaretto! The texture of this frosting is so unlike the grocery store variety - silky smooth with no Crisco aftertaste lingering on your tongue. If you've got the time to try it, please do! I used Davidson's pasteurized eggs so that salmonella wasn't an issue.

Decorating the cupcakes was so much fun! I bought a new box of parchment triangles. I folded up a bag and used my new 1M decorating tip. It made beautiful swirls! I just can't get enough cake decorating - I need some more birthdays to celebrate!!

Let me know if you decide to try the frosting!

Monday, May 11, 2009

I thought I'd quickly share some photos and a recipe for some yummy Cinnamon Rolls!

P5020044

They are really easy to make in the bread machine - the dough is ready to be rolled after about an hour and a half.

P5020045

Somewhere recently, I read a tip to brush an egg, rather than butter, on the dough because the egg holds on better to the filling, preventing it from leaking out the tops and bottoms of the rolls. I found it to work quite well.

P5020049

After rolling, filling, and cutting them, I cover them with plastic wrap and pop them in the fridge overnight. Then, I set my oven to turn on early in the morning and I bake the rolls as soon as I get out of bed. To prevent the inner rolls from staying gooey and the outer ones from over-baking, I've started putting them into smaller baking pans. Every roll is on the perimeter this way and gets done evenly.

They're ready for a delicious breakfast!

P5030053

I found the recipe on allrecipes.com, a great go-to site for almost any recipe. In the most recent making of these rolls, I was out of vanilla pudding mix, which I'm a little opposed to using anyway, and so I added an extra splash of vanilla and a good sprinkling of sugar to the dough. I figured that is all the pudding mix adds. My children and husband go bonkers over these - and me, too, but I have to exercise some restraint!

Enjoy!

Wednesday, April 29, 2009

Hi, foodie friends!

I'm going to have to take a break from the blog for a few weeks while I prepare a corporate tax return. I have been working away from home and will continue to for another month or so. Please sign up for a subscription to my blog, so you'll know when I've posted again! I really want to do a better job of updating it in the future, but life is getting wild here!!

Thanks for stopping by!

Monday, April 20, 2009

Homemade Mayonnaise

I have always wanted to try my hand at homemade mayonnaise. I've heard that it is so much different than store-bought and much better tasting. So, now that I've got a carton of Davidson's Pasteurized Eggs in my fridge, I decided it was time to give it a try. One of my friends asked me to bring vegetables over for dinner last weekend. I don't usually "do" vegetables for dinner parties, but it was a great chance for me to create an artistic display with a mayonnaise dip.

I had fun picking out the vegetables - they always look so gorgeous in their stacks at the market. So, I chose asparagus, broccoli, radishes, carrots with their tops still on (a special request from my daughter), grape tomatoes, and a purple cabbage which I prepared as a bowl for the dip - a beautiful range of colors, I decided.

P4170056

I blanched the asparagus and broccoli because I love the crispness with no raw taste. I let them sit for a couple of minutes in boiling water and then transferred them to my clean sink filled with ice water.

Do any of you ever start to get over-confident when cooking or baking? From what I've read over the years, mayonnaise can be a little tricky to make. To start, you whisk a couple of eggs together and then, v-e-r-y slowly, add oil, whisking quickly all the while. So, I whisked my eggs and then poured the oil from a Pyrex measuring cup, drop by drop, at first, and then started adding it in a trickle. I was feeling pretty confident - I was creating a beautiful, smooth emulsion of eggs and oil. I had to stop to rest a couple of times because I was so busy whisking. Initially, I had planned to do this in the food processor, but the eggs got flung to the sides of the bowl, so the blade wasn't even coming into contact with them, so I had to do it by hand.

It was really fun watching the emulsion come together. I stopped to look at the measuring cup to see how much oil was left and was disappointed to see I had only added about a third of the entire amount. My whisking arm was getting a little weak. But, I started trickling again, and then, because it was coming together so well, I turned the trickle into a bit heavier stream. Suddenly, because my whisk wasn't keeping pace with the heavier addition, the smooth, creamy mixture suddenly turned into a bowl of oil with some eggs mixed in. My mayonnaise had broken. Aarrgh. I had been feeling a little too proud of myself. I tried to dump the broken mess into the processor to see if I could revive it, even tried adding another egg as the directions suggested if the mixture broke, but I ended up pouring the mess down the sink and starting over. (Don't tell my plumber...)

The second time around, my poor little arm was even more tired!! But, the whisking had to go on! I was determined not to let the mayonnaise beat me. This time, I drip-dripped as slowly as I could manage, and hardly let it trickle even when I knew it was safe. I tried whisking with my left hand and pouring with my right, but that wasn't very smooth. Finally, I trickled the whole portion of oil into the eggs and it was a beautiful, creamy, smooth mayonnaise! Per the recipe, I added vinegar, salt, pepper, pimentos, mustard, garlic, and green onions. It turned out quite tasty. I think I'll try it again soon and make it right the first time around so I don't wear myself out!

Pimento Mayonnaise
Adapted from The Frog Commissary Cookbook

Makes 1 3/4 cups

2 egg yolks
1 1/3 c. corn oil
3 T. vinegar or lemon juice
1 t. salt
1 1/2 t. pepper
2 T. Dijon mustard
1/2 c. finely chopped pimentos, drained well
2 T. finely chopped scallions
1/2 t. minced garlic

Whisk the egg yolks until light-colored. Measure out the oil into a container suitable for controlled pouring, and very gradually (almost drop by drop) add about 1/3 of the oil to the yolks while continuously beating so that the mixture begins to emulsify and thicken properly. At this point, you can begin adding the rest of the oil in a thin trickle, working up to a gradual stream at the end. Your mayonnaise should now be thick, smooth, and glossy. Beat in the vinegar, salt, pepper, mustard, pimentos, scallions, and garlic. Cover and refrigerate if not using immediately. It will keep for about two weeks.

Thursday, April 9, 2009

World Peace Cookies

I love spring! We've got beautiful pink and white dogwoods blooming all over our yard, and several beautiful pale pink azaleas are showing off as well. The grass is greening up and the birds are starting to chirp early, early in the morning. I heard them before the sun was up this morning. My sweet children have been bringing blossoms to me to put in a vase beside my computer. We have all needed a dose of warmer weather and a chance to run and play outside in the sun!

Some new "cyber-friends" and I enjoyed a chance to try out the World Peace cookie recipe from a Dorie Greenspan cookbook. The recipe was featured on the Cookbook Habit blog back in February and you can find it by scrolling down on this webpage. These three friends and I made our cookies yesterday and agreed to review the recipe and post photos of the cookies today. One of my friends has a blog here - check up her review, too!

P4080004

For those of you who like salty and sweet, this cookie will scratch your itch! I love the combination of the two - I think sweet tastes much sweeter when there is a little salty to balance it. The cookie is a shortbread cookie with no eggs. I've made shortbread before, but never slowed down to realize that I wasn't adding eggs. So, I suppose that the omission of eggs adds to the crumbly texture of the cookies.

This recipe results in a deliciously chocolate-y flavor. I suggest using the mini-sized chips called for in the recipe. I used standard-sized chips because they're what I had on hand. The mini chips would surely have made the dough much easier to slice. I had to work hard to keep the cookies from crumbling too much because of the larger chips.

The combination of salty and sweet reminds me of a posting on Orangette with a New York Times chocolate chip cookie recipe calling for a sprinkling of sea salt on top. Those were good, too - I made them a few months ago and my husband loved them.

Back to the World Peace cookies. They were really easy to make. Cream butter and sugar, add dry ingredients, stir in chocolate chips, roll into a log, refrigerate overnight, and slice and bake! The only hard part was the slicing, but, as I wrote above, I imagine mini-chips would solve that dilemma.

I'm off to watch a Netflix movie that has been waiting on me for weeks - I've been too busy baking cupcakes and cookies to slow down to watch it. My husband wants me to get on with it because he's got some movies in the queue that he's ready to watch. I love movies! Maybe I should go pop some popcorn. Speaking of popcorn, remind me to share my two yummy popcorn recipes soon...

Tuesday, April 7, 2009

Springtime Cupcakes

I've been a busy baking bee since my last post! I have made another chocolate cake, two different chocolate frostings, two yellow cupcake recipes, AND a new vanilla frosting recipe. It's been fun to compare the flavors and textures of each recipe. I made and frosted cupcakes for a neighborhood Easter egg hunt. This frosting is amazing!! It's called Silk Meringue Buttercream and is from my latest fave, The Cake Bible. The recipe is a combination of crème anglaise and Italian Meringue Buttercream. The final product is wonderful - I had a hard time not diving into the bowl. I'm not usually a frosting lover, but this frosting is almost good enough to serve alone!

P4070004

Also, since my last post, I finished my Wilton Cake Decorating Course 1. Here's a photo of my final cake:

2009 03005

I had so much fun making the roses. I came home and tried making them with a cooked buttercream frosting and had much better success than with the prescribed Crisco frosting from my class. Last night, I made a few more roses and have them tucked away in the freezer for some special cake to come in the future.

2009 03011

I'm done with testing cakes for a few days now. Next time, maybe I'll post something savory!

Friday, March 27, 2009

Labor of love

An unexpected blessing has occurred since starting my blog. Thanks to this little corner of cyberspace, my already-strong marriage has improved!! When my husband read the glowing description of himself in my "About Me" section, he was so flattered that he started acting on his best behavior. Then, he joked that he's concerned that any mischief or misbehavior on his part will be directly posted here. So, I've got an even more incredible husband and father under my roof now! What a treat! He appreciates the extra baked goods that I've been experimenting with, so he's getting a good deal from this gig, too.

Believe it or not, I like to cook in addition to baking. You wouldn't know it from my first few posts (other than the fried taco shells), but I like to make entrees and sides in addition to desserts. If you read my first entry, you know that I was inspired to create this blog after joining The Daring Bakers club. The Daring Bakers club is an online group of folks who challenge each other once a month to try a new baking experiment - in the past, the group has made cakes, croissants, French baguettes, and lots of other delectable baked goods.

This month, my first as a Daring Baker, our challenge was to bake LASAGNA! I was a bit surprised, expecting a sweet baked good, but I have made pasta from scratch before and have wanted to do it again. I just hadn't gotten the kick in the pants until now! I used that as an excuse to buy an attachment for my KitchenAid mixer that's designed to roll and cut pasta dough.

The March 2009 challenge was hosted by Mary of Beans and Caviar, Melinda of Melbourne Larder and Enza of Io Da Grande. Rather than posting the frighteningly long recipe at the end of my entry, I'll refer you to their websites. My family will think I'm crazy if they read the recipe because they will see how much time it took - it did take several hours. I guess I AM crazy.

The day I made the pasta, I was also trying to finish decorating my mom's birthday cake, featured here. I was a little ambitious that day! The lasagna (and the cake) turned out well, but I want to invite my children to help next time - I was too hurried to ask for their help this last time. While they were outside selling lemonade with their dad, I chopped up some spinach, mixed it with flour and eggs in my mixer, rolled it out in my pasta attachment, and voila! I had lasagna noodles! The noodles were delicious. (The kids raked in $20 - we might have to do the lemonade stand more often!)

Here are the spinach, flour, and eggs ready for a beating!

P1020633

I hung the noodles on a dowel rod to dry overnight. I should have cut them into shorter lengths. Several of them flung themselves to the floor after tiring of holding on - sort of like I do when my husband pushes me to do pull-ups.

P1020641

After making the noodles, I made a ragu and a bechamel (white) sauce. Despite misreading the recipe for the ragu, it turned out well. The recipe called for 3 canned tomatoes. Somehow, I turned that into 3 CANS of tomatoes - oops! After adding the second of three cans, I decided I was not going to follow that recipe anymore, so I skipped the third can. Later, I discovered my error, but only after assembling and eating the lasagna. Turns out, the extra tomatoes didn't cause trouble, even though the sauce would not cook down to the consistency of a stew as indicated in the recipe! (I was quite perplexed that it would not perform, especially after letting it simmer for twice the amount of time called for.) As I wrote, though, the lasagna was great in spite of my mistake. It might have been more subtle without all the tomatoes, but I liked it as it was.

After preparing the extra-tomatoey ragu and bechamel, I layered them with the spinach noodles and a cup of grated Parmesan. The finished product was gorgeous and delicious! Parker devoured a third of it at dinner. He runs every morning, religiously, so he can get away with eating just about anything he wants (stinker!). We froze the rest and ate it for lunch a few days later.

If any of you are up to the challenge of trying the recipe, I'd love to hear about your results!

The March 2009 challenge is hosted by Mary of Beans and Caviar, Melinda of Melbourne Larder and Enza of Io de Grande. They have chosen Lasagne of Emilia-Romagna from The Splendid Table by Lynne Rossetto Kasper as the challenge.

All recipes from The Splendid Table: Recipes from Emilia-Romagna, the Heartland of Northern Italian Food by Lynne Rosetto Kasper (published by William Morrow and Company Inc., 1992).

Thursday, March 19, 2009

Chocolate Cake


It started with a couple of slices, as you can see here:

P1010042

Then, I shared a slice with a friend, and another few slices of the cake with a lunch group today. The rest of the damage was done by my chocolate-cake-obsessed husband and me!! In just over twenty-four hours!! I'm so ashamed of myself. Actually, it's my husband who should be ashamed of himself - I think I had only two reasonable slices. He went to TOWN on this cake.


I blame The Cake Bible (TCB) again. As I mentioned in my About Me section, I love to try lots of recipes to be sure I'm using the absolute, all-time best. Have you ever read Cook's Illustrated magazine? It's published by America's Test Kitchen and it doesn't accept ads. So, I trust the recipes and reviews inside. The testers assemble scores of recipes for, say, vanilla ice cream, test each one, and determine which is the best by their definition. I'm fascinated by the differences the testers uncover in the different mixing techniques, quality of products used, baking times and temperatures, etc. I went so far as to sign up on the website to be a recipe tester - I'm not sure how much they take into account the reviews of those of us that are signed up for that job, since we're not employed by them, but it's fun to try new recipes to see if they "work." I've only attempted two of the recipes I've been sent - one for a delicious Chicken Tikka Masala that I'll try to post at a later date and one for Raspberry Cream Cheese Brownies that didn't float my boat.

Anyway, I digress. Back to the chocolate cake and TCB. I have been taking this cake decorating class and have a tiny little whisper in the back of my head telling me to start a business selling cakes, cookies, and other baked goodies. So, I've taken it upon myself to test my recipes to be sure I would be going to market with the best of the best. I LOVE Barefoot Contessa's Chocolate Buttercream Cake (there's a photo of the cake right here), but some of the ingredients are a little more difficult to keep on hand - namely sour cream and buttermilk. With no resistance from my husband, I decided that I should try the Perfect All-American Chocolate Butter Cake with the Dark Chocolate Ganache Frosting from TCB. Wow - what a combination. The cake is super-moist and chocolately and the texture and consistency of the ganache is amazing. The ganache is incredibly easy to make - it took me about ten minutes, but it does have to cool overnight before frosting a cake, so be sure you factor that into your equation. All you do is process chocolate in a Cuisinart, add warmed cream while the food processor is running and that is IT! Piece of cake! (oops - no pun intended...)

I am probably going to try making the cake again because for some reason, it didn't release well from the pan and fell apart when I tried to level it with a serrated knife. But, before I do, I'm going to try the Chocolate Fudge Cake from the same cookbook. I'll post that another day, too.

How can I harness all of the recipe testing that I'm so compelled to do?!? I have such a long list: the aforementioned Chocolate Fudge Cake, the also aforementioned Chicken Tikka Masala, another batch of the Mousseline Buttercream frosting to experiment with flavor-wise and piping-wise, as well as all of my tried-and-true cookie recipes? Does anyone else get all aflutter and anxious inside because there are so many fun and exciting things you want to do, but just not enough hours in the day to do them? On good days, I make myself do the non-negotiables (that I regrettably turn into negotiables a lot of days...) like laundry, fixing dinner, changing diapers, etc. before I allow myself to piddle in the kitchen. That, unfortunately, leaves me little time to do the things I'm more passionate about - playing with my children, baking, and so on. I'm so dependent on a good night's sleep, too, so I have to make time for that. What's a poor girl to do?!?

My cake decorating class at Michael's has been fun, but I've got a long way to go before I master shells, star flowers, and roses attractively and consistently. I also like to put chocolate-covered anything on top of a chocolate cake - coffee beans, almonds... They are a quick makeover helper, too.

Without further ado, here is the recipe for the ganache. It is so easy to make and to spread. I didn't spend much time getting the cake to look good - I could have made it smoother, but I was ready to eat it!! I can't wait for you to try the frosting. Let me know what you think!!!

Dark Chocolate Ganache Filling, Frosting, and Sauce, adapted from The Cake Bible by Rose Levy Beranbaum

Makes 2 3/4 cups to 3 cups

12 ounces bittersweet chocolate (I used plain ol' Nestle Toll House morsels)
1 2/3 liquid cups heavy cream

Break chocolate into pieces and process in a food processor until very fine. Heat the cream to the boiling point and, with the motor running, pour it through the feed tube in a steady stream. Process a few seconds until smooth. Transfer to a bowl and cool completely until of frosting consistency.

To use ganache as a sauce, reheat until pourable if made ahead, using a double boiler or microwave on low power, stirring every 15 seconds.


Monday, March 16, 2009

Crispy Goodness

Wow - each Monday has been rolling around very quickly here in my house!! I thought I would have time to post more often than once a week, but even that frequently is proving a challenge. My little family cannot seem to stay well at the same time. My littlest peanut has an ear infection that just won't quit. He's now on two antibiotics at once and seems to be feeling better after six days. His favorite food to make is waffles - a chip off his grandfather's block. I indulged him a few days ago when he was suffering with a 104-degree fever.

When I was little, my dad used to make waffles for my sister and me on the weekends with lots of butter and lots of syrup warmed in a brown pottery crock in the microwave. I liked to be sure that each little well of the waffle had its own puddle of butter and syrup. It's hard for me to resist doing that now when I make waffles for my own children!

Speaking of indulgences, have you ever fried your own tortillas for tacos? If you have never tried it, you are really missing out!! See the crispy, delicious treats below? They are incredibly simple and sooo tasty! All you do is heat oil on the stove and gently lay a corn tortilla in the oil. Let it sizzle until it is golden brown on one side and then flip it to the other side with kitchen tongs. There is probably a fancy technique for getting a good curve in the middle so it looks like a taco shell, but I just bend the tortilla with my tongs and hold it in the oil in that shape until it holds. Lay the tortillas to drain on dish towels and sprinkle with salt. If cooked just right, they are crispy on the outside with a chewy inside.


I like to tell my food to say, "Cheese!" when I take pictures. The taco shells really like that.


So, here's the quick recipe for homemade taco shells:

Corn tortillas
Peanut or vegetable oil
Salt

Heat the oil - I didn't use a thermometer - just turned my electric burner to 9. When a drop of water sizzles in the oil, it's hot enough. Gently lower one tortilla into the oil and when it's golden on the underside, flip to the other side. Remove when just barely golden on both sides if you want it to stay a little chewy. If you want it crunchy, then leave it in longer. You can experiment to find the texture you like best. Sprinkle salt on the tortillas just after removing them so it can stick to the hot oil. Let cool and enjoy!

These would probably be yummy with cinnamon and sugar sprinkled on top instead of salt. That's for another day...

Monday, March 9, 2009

Crepes and cakes

Whew - what a couple of weeks! Two weeks ago, my littlest child had a double ear infection and had to miss two days of school. Then, it snowed, so the children were out of school for two more days. Then, my middle child got a fever and missed two days more! It's a good thing my accounting job was a little slow or I would have been burning some serious midnight oil between taking care of the children and trying to get my work done.


Somehow in the midst of all of the sickness and snow, I tried two additional crepe recipes, just to see which one I liked the best. (This is where the egghead comes in - I always like to try lots of recipes to make sure I'm using the very best one. I've subscribed to Cook's Illustrated for too long...) One of the two crepe recipes was from The Cake Bible and used cornstarch instead of flour. These were quite tasty crepes - the batter included vanilla which made them yummy. The other recipe was from The New Basics Cookbook by Julie Rosso and Sheila Lukins. It was a good one, too, but we didn't like it as much as the other ones. My husband, the expert crepe tester, likes the crepe recipe we tried from Joy of Cooking. I think that was my favorite, too, but I'm going to add vanilla to the batter the next time I make this recipe.


Also, this week, I made a new cake for my mom's birthday. I whipped up my first genoise with orange curd filling and orange mousseline buttercream frosting, all from "The Cake Bible." It turned out as it was supposed to, but the orange flavor lacked the zip I think it needed. It was too sweet with neither salty nor tangy counterpoint. I would like to try again but with lemon juice and zest to create the curd and buttercream. In the cake's defense, the buttercream was ultra-smooth and the cake was light and moist. I'll share the orange buttercream recipe, but know that I will make it with the lemon variation next time around.

I'm taking a Wilton cake decorating class at Michael's this month, so there will more cake posts to come!


Mousseline Buttercream (adapted from The Cake Bible by Rose Levy Beranbaum)

Makes 4 1/2 cups

1 lb. unsalted butter, cool room temperature
1 c. sugar
1/4 c. water
5 large egg whites
1/2 + 1/2 t. cream of tartar
3 T. Grand Marnier
1/2 c. orange curd

IN a mixing bowl, beat the butter until smooth and creamy and set aside in a cool place.

HAVE ready a heatproof glass measure near the range.

IN a small heavy saucepan, heat 3/4 c. sugar and the 1/4 c. water, stirring constantly, until the sugar dissolves and the mixture is bubbling. Stop stirring and reduce the heat to low. (If using an electric range, remove from the heat.)

IN another mixing bowl, beat the egg whites until foamy, add the cream of tartar, and beat until soft peaks form when the beater is raised. Gradually beat in the remaining 1/4 c. sugar until stiff peaks form when the beater is raised slowly. Increase the heat and boil the syrup until a thermometer registers 248 to 250 degrees. Immediately transfer the syrup to the glass measure to stop the cooking.

IF using a hand-held mixer, beat the syrup into the whites in a steady stream. Don't allow the syrup to fall on the beaters or they will spin it onto the sides of the bowl. If using a stand mixer, pour a small amount of syrup over the whites with the mixer off. Immediately beat at high speed for 5 seconds. Stop the mixer and add a larger amount of syrup. Beat at high speed for 5 seconds. Continue with the remaining syrup. For the last addition, use a rubber scraper to remove the syrup clinging to the glass measure. Lower speed to medium and continue beating up to 2 minutes or until cool. If not completely cool, continue beating on lowest speed.

BEAT in the butter at medium speed 1 T. at a time. At first the mixture will seem thinner but will thicken beautifully by the time all the butter is added. If at any time the mixture looks slightly curdled, increase the speed slightly and beat until smooth before continuing to add more butter. (Note: I finally had to put the frosting in the fridge until it cooled down to 68 degrees. It was not getting smooth.)

LOWER the speed slightly and fold in the curd and liqueur. Place in an airtight bowl. Rebeat lightly from time to time to maintain silky texture. Buttercream becomes spongy on standing.

Monday, March 2, 2009

Greetings! For many months, I have been lurking on a variety of foodie blogs and have finally decided to start my own. My greatest incentive to start is that I just became a member of The Daring Bakers. While they don't require their members to have blogs, I thought it would be fun to start one.

I obsess about food, and I love to find other cyber-foodies who think about food as much, and in the same way, I do!

Last night, my husband asked me to make crepes. (Please pardon the missing accent - I don't know how to add it here...) I have never made crepes, but have always wanted to try. So, try I did. I used the recipe from Joy of Cooking (see below for recipe) and the crepes turned out wonderfully. The first couple of crepes turned into jumbled flops as I tried to flip them, but I got the hang of it by the third or fourth crepe. By the twelth, I had figured out the correct amount of batter to pour and how long to let the crepe cook before flipping. I also discovered toward the end that the crepes are incredibly easy to flip. I had been quite timid in flipping the first few, but realized halfway through that those crepes were very sturdy, once they were allowed to set properly. So, I was having a good time flipping them by the end! My 5 year-old son enjoyed them with powdered sugar this morning. One of these days, I'm inclined to try Crepes Suzette.

Sometimes, my excitement about baking gets the best of me and I have to remind myself to fold and put away laundry or unload the dishwasher or make a balanced dinner for my family of five before experimenting with a new dessert recipe. Lately, I have been daydreaming about going into business selling cookies. I have a handful of really great cookie recipes about which my friends rave. Time will tell whether that dream becomes a reality or not.

I decided to start with a blog, and I'll go from here...

Basic Sweet Crepes from "Joy of Cooking"

Serves 12

Ingredients
  • 1/2 cup all-purpose flour
  • 1/2 cup milk
  • 1/4 cup lukewarm water
  • 2 large eggs
  • 2 tablespoons unsalted butter, melted
  • 1 1/2 tablespoons sugar
  • 1 pinch salt

Directions

  1. Pour the batter into a pitcher or other container with a pouring lip.
  2. Cover with plastic wrap and let stand for 30 minutes or in refrigerate for up to 2 days. (This allows the flour to thoroughly absorb the liquid and gives the gluten in the flour a chance to relax.).
  3. Place a nonstick or seasoned crepe pan over medium heat. Coat the pan with a little unsalted butter.
  4. Stir the batter and pour about 2 tablespoons into the pan, lifting the pan off the heat and tilting and rotating it so that the batter forms an even, very thin layer. Cook until the top is set and the underside is golden. Turn the crepe over, using a spatula or your fingers (fingers work best here) and cook until the second side is lightly browned. Remove the crepe to a piece of wax paper. Continue cooking the rest of the crepes, buttering the pan and stirring the batter before starting each one.
  5. Stack the finished crepes between sheets of wax paper.
  6. Use immediately or let cool, wrap airtight and freeze for up to 1 month.